Scheduling Jobs
When you first ssh into klone you land on one of the two login nodes (e.g., klone-login01). Login nodes are shared amongst all users to transfer data, navigate the file system, and request resource slices to perform heavy duty computing. You should never use login nodes for heavy computing and automated mechanisms exist to monitor and enforce violations. The tool used to notify users of violations is "arbiter2" and you will receive an email for each offending process (Gardner, Migacz, and Haymore 2019).
To keep the login node in stable working order and ensure fair usage of the login node as a community resource, Hyak has a job scheduling software that will give you access to other nodes (i.e., different computers that are part of the klone cluster). The job scheduler software is called Slurm, and regular users of Hyak need to learn how to use Slurm to effectively and efficiently make use of Hyak as a resource for research computing.
Account: In the context of using Slurm, "account" refers to the group/s you belong to, not your UWnetID. The hyakalloc command will display accounts you can submit jobs with (i.e., under the Slurm sbatch directive --account).
Checkpoint partitions: Abbreviated ckpt, ckpt-g2, and ckpt-all, represents idle resources across the cluster at any moment. All cluster users are eligible to submit jobs to this partition and they will run subject to availability. To provide some regular churn in pending checkpoint jobs, jobs running for >4 hours (for HPC jobs) and >8 hours (for GPU jobs) are re-queued (i.e., re-submitted to the checkpoint partition queue). The jobs will continue in this manner until the job exits or the requested runtime is fulfilled. For more information see Using Idle Resources.
Idle Resource: A cluster resource is "idle" when it currently has no running jobs. Requested idle resources are not guaranteed.
Interactive Session: An interactive session on the cluster allows users to access a compute node in real time for tasks that require direct interaction, exploration, or debugging. Request an interactive job with the salloc command.
Node: In HPC, a server is synonymous with a node. 1 server = 1 node so it is OK to use those two terms interchangeably. You can also think of nodes as distinct but network-connected computers.
- HPC Node: A standard compute node with no additional components and variable amounts of memory at time of procurement.
- GPU Node: A standard node with GPU cards added in at time of procurement. GPUs are typically used for machine learning workflows and in rarer cases for applications that have been specifically ported over to GPUs to speed up the runtime.
Partition: A partition is a logical subdivision of the Hyak cluster resources. Specifically, each partition represents a class of node. For example, the partitions on the cluster are compute, cpu-g2, ckpt, ckpt-g2, ckpt-all,compute-bigmem,cpu-g2-mem2x, and GPU nodes. hyakalloc will display partitions in addition to ckpt that you can submit jobs with (i.e., under the Slurm sbatch directive --partition).
Queue: A queue is a waiting area for jobs that have been submitted to the cluster but are not yet executing. The scheduler manages the order in which jobs are taken from the queue for execution. The Slurm queue can be monitored with the command squeue and squeue -u UWNetID replacing the word UWNetID with your UW Net ID will show you submitted that are waiting in the queue or are being executed.
Scheduler: A job scheduler is a component or software system responsible for managing and optimizing the allocation of computing resources and tasks within a distributed computing environment. It orchestrates the execution of jobs, tasks, or processes across available resources such as CPUs, memory, and storage.
Slurm: The job scheduler used on Hyak. Slurm stands for Simple Linux Utility (for) Resource Management. See Slurm documentation for detailed help using the job scheduler.
Set Up
If you haven't already log on to klone for this tutorial.
# Below replace the word "UWNetID" with your UW NetID.
ssh UWNetid@klone.hyak.uw.edu
For the following exercises, we will create a working directory for this tutorial. We recommend starting your working directory in a filesystem location where you have a large storage quota, not in your Home directory (limit 10GB; Click here to learn more about Home directory storage limits). For this demonstration, we will create a working directory to use Hyak's free community storage under /gscratch/scrubbed (Click here to learn more about Scrubbed storage). First navigate to /gscratch/scrubbed:
cd /gscratch/scrubbed/
If you have not already, make a directory with your UW NetID with mkdir and go into it:
# Below replace the word "UWNetID" with your UW NetID.
mkdir UWNetID
cd UWNetID
This will be your working directory for this section. Note that files and directories will be deleted after 21 days if they are not used.
To start, copy the necessary tutorial materials to your working directory. Because we are copying an entire directory, make sure to use -r to recursively copy:
cp -r /sw/hyak101/basics .
# Above the "." is shorthand for "here" or the current directory.
Ensure all materials were copied into your working directory:
cd basics
ls
This directory contains other materials, but the materials listed below will be used in the next exercises.
data/
locator.sif
locator_NN_job.slurm
locator_NN_array.slurm
locator_NN_dropouts.slurm
loop_array.slurm
loop_job.slurm
loop_script.sh
Accounts and Partitions
The first stop on understanding job scheduling is to understand that every user is part of an account and thus has access to certain partitions. Your account is usually related to a lab or research group that you belong to; for example, you may be part of a lab group that has contributed resources to Hyak, affording you priority usage of those resources, which are organized into one or more partitions. Alternatively, you may be a student user who is part of the Research Computing Club, or account stf, meaning that you have priority access on the stf account, which allows you to use several partitions. Additionally, all users can use Hyak resources when they are idle by scheduling jobs on the ckpt, ckpt-g2, or ckpt-all partitions (Click here to learn about more about ckpt jobs.).
If you are a student who is paying the student technology fee (STF), you are eligible for an stf account which will increase your access and user experience on Hyak because there are designated resources for students. Click here to find out how to get an STF account. NOTE: The Hyak Team doesn't manage the stf account group.
Let's start by checking which accounts and partitions you have access to with the hyakalloc command.
hyakalloc
The result will look different for each user. Yours might look something like this:
      Account resources available to user: UWNetID
╭─────────┬──────────────┬──────┬────────┬──────┬───────╮
│ Account │    Partition │ CPUs │ Memory │ GPUs │       │
├─────────┼──────────────┼──────┼────────┼──────┼───────┤
│ account │      compute │  120 │   509G │    0 │ TOTAL │
│         │              │    0 │     0G │    0 │ USED  │
│         │              │  120 │   509G │    0 │ FREE  │
├─────────┼──────────────┼──────┼────────┼──────┼───────┤
│ account │    gpu-rtx6k │   10 │    81G │    2 │ TOTAL │
│         │              │    0 │     0G │    0 │ USED  │
│         │              │   10 │    81G │    2 │ FREE  │
╰─────────┴──────────────┴──────┴────────┴──────┴───────╯
 Checkpoint Resources
╭───────┬──────┬──────╮
│       │ CPUs │ GPUs │
├───────┼──────┼──────┤
│ Idle: │ 1138 │  242 │
╰───────┴──────┴──────╯
This example output for a user from the fictional Account called "account" shows access to a compute partition and a gpu-rtx6k partition. The displayed partitions could include compute partitions, larger memory partitions, and GPUs. The table also shows which resources under the account are being used when the hyakalloc command was executed (as shown, all resources are free at the moment). The bottom table shows how many CPUs and GPUs are idle under the checkpoint partitions.
The hyakalloc results are a tool for you to prepare your job request. For example, if you want to use a compute partition, but all the CPUs are being used, you might consider using another partition with free CPUs or the ckpt-all partition.
If you are using Hyak is a demonstration account, your hyakalloc table will look like the following because you are not part of a Hyak account group and you have not been given access to a partition with priority access.
╭─────────┬───────────┬──────┬────────────────────┬──────┬───────╮
│ Account │ Partition │ CPUs │             Memory │ GPUs │       │
├─────────┼───────────┼──────┼────────────────────┼──────┼───────┤
│    demo │   pending │    0 │ 18014398509481972G │    0 │ TOTAL │
│         │           │    0 │                 0G │    0 │ USED  │
│         │           │    0 │ 18014398509481972G │    0 │ FREE  │
╰─────────┴───────────┴──────┴────────────────────┴──────┴───────╯
For some of the next presented exercises, you can ignore the --account flag, and you will only be able to request jobs from the checkpoint partitions (ckpt, ckpt-g2, and ckpt-all) with the --partition flag.
While you won't necessarily have access to them, it might be useful for you to see a list of Hyak's partitions. The sinfo commands contains information about the servers or nodes that compose Hyak, and the sinfo -s commands give you a summary for this information including the partitions and the hostnames that fall into each partition.
sinfo -s
PARTITION        AVAIL  TIMELIMIT   NODES(A/I/O/T) NODELIST
compute-bigmem      up   infinite        28/0/0/28 n[3008-3011,3064,3066,3132-3133,3190,3244-3247,3252-3255,3353-3355,3400-3407]
ckpt                up   infinite   327/173/10/510 g[3001-3007,3010-3017,3020-3027,3030-3037,3040-3047,3050-3057,3060-3067,3070-3077,3080-3085],n[3000-3431],z[3001-3002,3005-3011]
ckpt-all            up   infinite   368/195/10/573 g[3001-3007,3010-3017,3020-3027,3030-3037,3040-3047,3050-3057,3060-3067,3070-3077,3080-3085,3090-3122],n[3000-3461],z[3001-3002,3005-3011]
ckpt-g2             up   infinite       41/22/0/63 g[3090-3122],n[3432-3461]
compute*            up   infinite    197/170/7/374 n[3012-3015,3024-3063,3068-3131,3134-3189,3191-3239,3248-3251,3256-3299,3304-3352,3356-3363,3368-3399,3408-3431]
cpu-g2              up   infinite        7/19/0/26 n[3432-3438,3440,3442,3444,3446-3461]
cpu-g2-mem2x        up   infinite          2/2/0/4 n[3439,3441,3443,3445]
gpu-2080ti          up   infinite        10/1/2/13 g[3001-3007,3014-3017,3027],z3001
gpu-a100            up   infinite          8/0/0/8 g[3080-3085],z[3010-3011]
gpu-a40             up   infinite        32/0/0/32 g[3040-3047,3050-3057,3060-3067,3070-3077]
gpu-l40             up   infinite        15/0/0/15 g[3090-3099,3115-3119]
gpu-l40s            up   infinite        17/1/0/18 g[3100-3114,3120-3122]
gpu-p100            up   infinite          2/0/0/2 z[3005-3006]
gpu-rtx6k           up   infinite        19/0/0/19 g[3010-3013,3020-3026,3030-3037]
gpu-titan           up   infinite          1/0/0/1 z3002
compute-hugemem     up   infinite        27/2/1/30 n[3000-3007,3016-3023,3065,3067,3240-3243,3300-3303,3364-3367]
compute-ultramem    up   infinite          3/0/0/3 z[3007-3009]
Monitoring the Slurm Job Queue
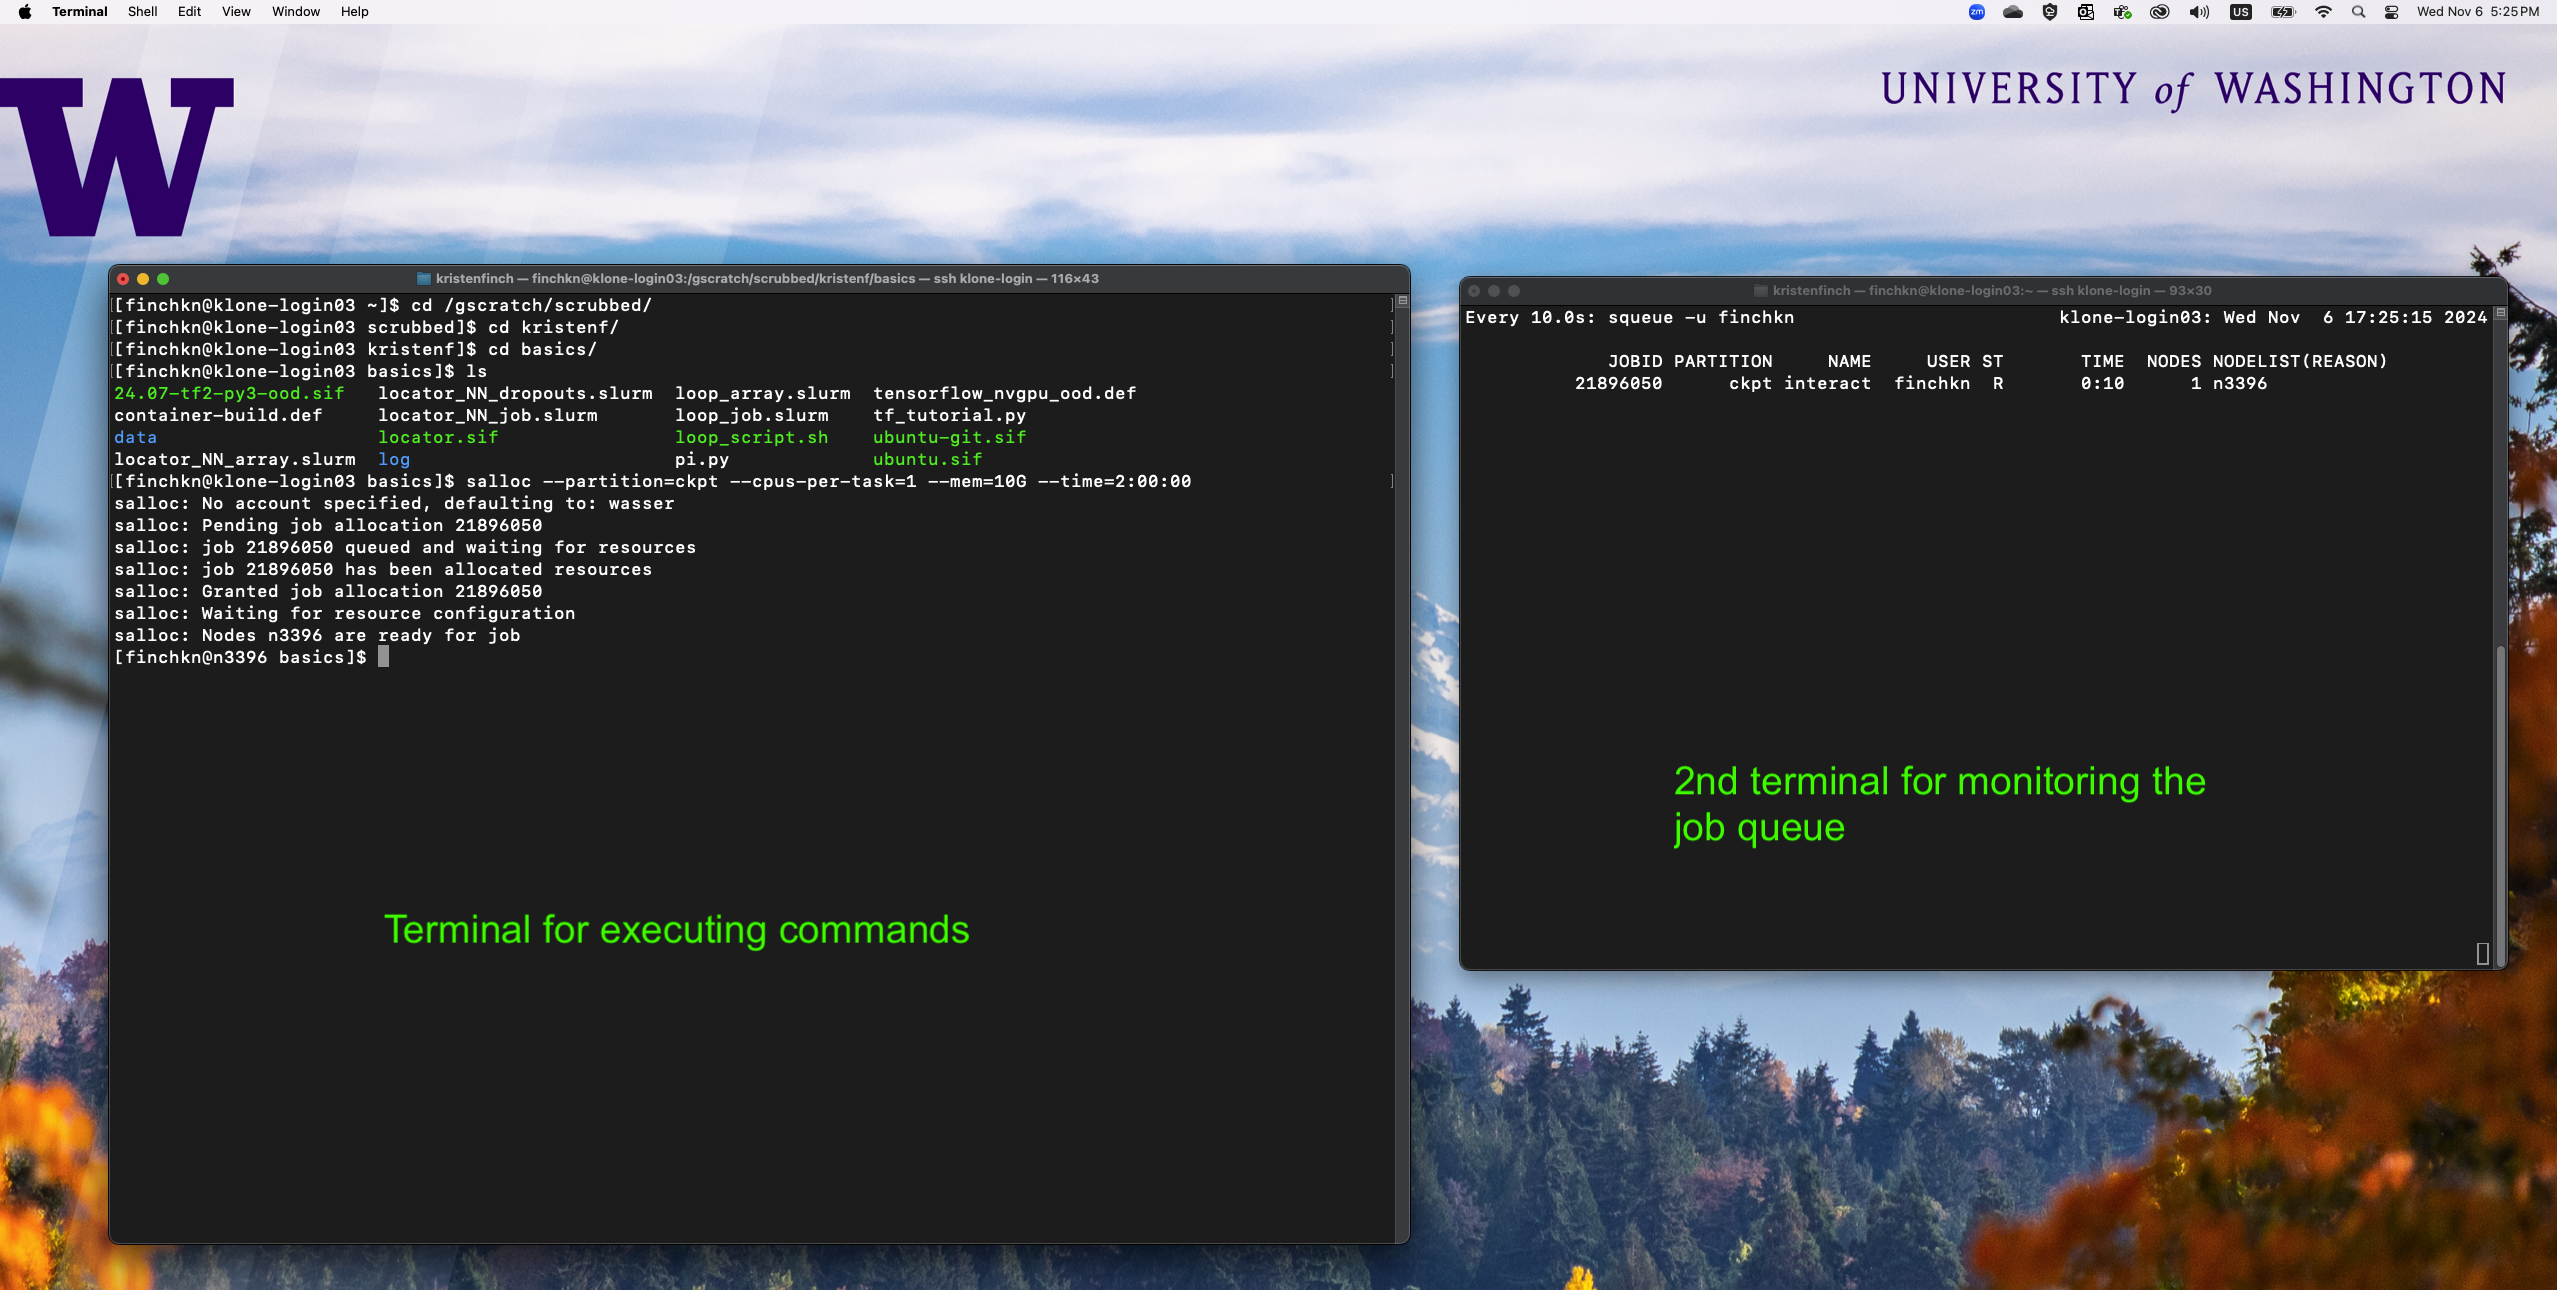
In the following section, it is often useful to have two terminal windows open and logged into klone. One for editing scripts and issuing commands and one for monitoring active jobs in the squeue. Open up a second terminal and use ssh to login to Hyak. In this terminal, monitor jobs using the command:
# Below replace the word "UWNetID" with your UW NetID.
watch -n 10 squeue -u UWNetID
watch -n 10 will issue the following command ( squeue -u UWNetID ) every 10 seconds, allowing you to see the jobs you have submitted enter the queue and change states. Right now the queue is likely empty because we haven't requested any jobs yet, but they will appear in this window as we continue with the tutorial.
The state of the job is listed under "ST" in this window. Some of the most common job states are:
- PD: Pending job
- R: Running job
- S: Suspended job
- CG: Completing job
- CD: Completed job
In the next exercises, leave this terminal open and executing the watch -n 10 squeue -u UWNetID and continue with the exercises in the other terminal window.
Interactive Jobs
An interactive session on the cluster allows users to access a computing node in real time for tasks that require direct interaction, exploration, or debugging. Use the salloc command to request an interactive job. If you have a quick job, need to test many commands individual that will later become the components of a script, or you are preparing software to use later, an interactive session may be the best choice. Let's start an interactive job on the ckpt-all partition (feel free to use another partition if you like). We will specify that we want a single CPU with the flag --cpus-per-task=1, 10G of RAM with --mem=10G, and a maximum time of 2 hours with --time=2:00:00. The job will automatically end after 2 hours if we don't end it before 2 hours has elapsed.
salloc --partition=ckpt-all --cpus-per-task=1 --mem=10G --time=2:00:00
The output will look something like this:
salloc: Pending job allocation 18981043
salloc: job 18981043 queued and waiting for resources
salloc: job 18981043 has been allocated resources
salloc: Granted job allocation 18981043
salloc: Nodes n3424 are ready for job
Relevant information from this output is:
- The JobID, which in this example is 18981043 but will be a different integer for every job on Hyak, is a unique identifier for the job. If you have specific questions about a job you ran, it can be good practice to make note of the JobID so that the Hyak support staff find the job and better understand the request and behavior.
- The nodes or Hostname that were provisioned for the job, in this example the job is running on a compute node called
n3424.
After your job has been requested and has started, your shell prompt will show that you are no longer on the login node, or look something like this:
[UWNetID@n3424 basics]$
Except that the word UWNetID will be replaced with your Net ID and n3424 will be replaced with the node Slurm assigned to your interactive job. Finally, the word basics will be replaced with the name of your current directory (your location on the filesystem); if you have been following along, your current directory should be the basics directory that we copied as part of the Set Up for this tutorial.
By completing the salloc command exercise, you have successfully scheduled a job on Hyak using Slurm. You might always hear this method described as, "Starting an interactive job on a compute node." In the next section, we will use this interactive job to run a simple script.
You can also request an interactive session on a GPU with salloc.
Requesting GPUs from a GPU partition
Use your hyakalloc command to see the GPU partitions associated to the accounts you are part of; you will be able to schedule jobs on these GPU resources with priority. Using this example:
      Account resources available to user: UWNetID
╭─────────┬──────────────┬──────┬────────┬──────┬───────╮
│ Account │    Partition │ CPUs │ Memory │ GPUs │       │
├─────────┼──────────────┼──────┼────────┼──────┼───────┤
│ account │    gpu-rtx6k │   10 │    81G │    2 │ TOTAL │
│         │              │    0 │     0G │    0 │ USED  │
│         │              │   10 │    81G │    2 │ FREE  │
╰─────────┴──────────────┴──────┴────────┴──────┴───────╯
The command to start an interactive job on a GPU node would look like the following:
salloc --account=account --partition=gpu-rtx6k --gpus=1 --mem=10G --time=2:00:00
# Above replace the account and partition flags to match your account and partitions.
Which would give you a job with 1 CPU (default), 1 GPU, and 10G of RAM for 2 hours.
Requesting GPUs from Checkpoint
If you are requesting a GPU job as a demonstration account user or as a user without priority access to a GPU partition, you will request GPU jobs from checkpoint idle resources. If you need to request a GPU node via checkpoint, the salloc command will be similar to the following:
salloc --partition=ckpt-all --gpus-per-node=a40:1 --mem=10G --time=2:00:00
Which would give you a job with 1 CPU (default), 1 A40 GPU, and 10G of RAM for 2 hours. Note that when requesting GPU jobs from the ckpt, ckpt-g2, or ckpt-all partitions you must include the GPU model or type after --gpus-per-node and the number of GPUs you want to allocate. In this example, we are requesting one Nvidia A40 GPU.
Identifying Idle GPU Types
When requesting GPUs from checkpoint idle resources, it might be useful to use the following command to identify idle GPU types.
sinfo -p ckpt-all -O nodehost,cpusstate,freemem,gres,gresused -S nodehost | grep -v null
The start of the output will look something like this indicating that there :
HOSTNAMES       CPUS(A/I/O/T)       FREE_MEM     GRES             GRES_USED
g3003           10/0/30/40          361637       gpu:2080ti:8     gpu:2080ti:1(IDX:2)
Showing that there are at least seven (out of eight) idle 2080ti GPUs and one could be requested with
salloc --partition=ckpt-all --gpus-per-node=2080ti:1 --mem=10G --time=2:00:00
Confirming the GPU is Active
After requesting a GPU job, you can check to see if the GPU is active using the nvidia-smi command:
nvidia-smi
The output will be two tables. The first table shows information such as the temperature (degrees Celsius), performance state (ranging from P0-P12, where P0 is the maximum performance state) and how much memory is used for all available GPUs. The second table provides information on all the processes using GPUs.
To continuously update the output every 5 seconds, use the flag --loop = 5:
nvidia-smi --loop=5
A Simple Script as a Command Proxy
A CPU job and a GPU job will work equivalently in this section
After requesting an interactive job, let's try to run a simple script on the compute node. If you have been following along, you should have loop_script.sh in the basics directory.
ls
data  locator_NN_dropouts.slurm      locator.sif      loop_job.slurm
locator_NN_array_slurm  locator_NN_job.slurm    loop_array.slurm  loop_script.sh
Use the cat or nano command to view this script.
cat loop_script.sh
The point of showing you this script is not how the script is coded or what the script does. We will use this script in the next sections to demonstrate executing commands with Slurm job scheduler. This script is a proxy for scripts or commands you might use on Hyak. Our main goal is to prepare you to adapt the Slurm commands for your research computing projects on Hyak.
#!/bin/bash

start=$1  # Starting number (first argument)
end=$2    # Ending number or last iteration (second argument)

if [ -z "$start" ] || [ -z "$end" ]; then
  echo "Usage: $0 <starting_number> <ending_number>"
  exit 1
fi

for ((i=start; i<=end; i++)); do
  if [ $i -eq $end ]; then
    echo "Sequence complete! Iterations from $start to $end."
  fi
done
loop_script.sh will take a starting point and an ending point and count until variable i=ending point. To execute this, use ./ with the desired starting and ending values:
./loop_script.sh 0 1000000
The output should look like this:
Sequence complete! Iterations from 0 to 1000000.
To see how long a job took, use the time command:
time ./loop_script.sh 0 1000000
The output should look something like this:
Sequence complete! Iterations from 0 to 1000000.

real    0m4.216s
user    0m4.071s
sys     0m0.068s
The real time is the wall-clock time it takes for a job to finish. In this case, the job completed in 4.216 seconds. It might have taken more or less time for you. The user time refers to the amount of time the CPU spends in user mode within the process and the system time is the amount of time the CPU spends in kernel (or supervisor) mode.
In the next section, we will execute time ./loop_script.sh 0 1000000 again but this time as a batch job, that is executed without our supervision.
OPTIONAL: To end an interactive job, type exit into the terminal
Batch Jobs
For longer running jobs, we recommend using a Slurm or sbatch script to submit a batch job rather than execute commands with an interactive session. Batch jobs are executed "in the background" or submitted to be executed on a compute node without the user's supervision. With batch jobs, a user can prepare their commands, instruct Slurm which resources (the number of CPUs, GPUs, memory, and time) the job needs to execute successfully, submit the job and end their connection to Hyak, and then return to view the results of the job when it has completed.
In this section, we will be using the loop_job.slurm script in the basics directory to run loop_script.sh as a batch job. Use nano to view and edit loop_job.slurm, and we will walk through sections of the script.
nano loop_job.slurm
The first few lines of loop_job.slurm should look like this:
#!/bin/bash

#SBATCH --job-name=loop_job
#SBATCH --partition=ckpt
#SBATCH --nodes=1
#SBATCH --ntasks-per-node=1
#SBATCH --mem=1G
#SBATCH --time=5:00
#SBATCH -o log/%x_%j.out
Slurm job scripts are written in the coding language bash and as such start with #!/bin/bash, also known as a "shebang." This ensures that the bash shell is used to run the script. The subsequent flags starting with #SBATCH are options for the sbatch command and communicate the specifications of the job that is being requested. Notice how the flags are reminiscent of the salloc command flags.
As written, this script requests a single task with 1G RAM named loop_job to be sent to the ckpt partition. The maximum time for the job is set to 5 minutes. The #SBATCH -o log/%x_%j.out requests that the standard output (stdout) or information that is usually printed to the screen during the execution of a command be saved to an output file. This line also sets up the filename for the output file; in this case, the file will be saved to a directory called log/ and the file will be similar to loop_job_123456789.out because the %x is shorthand for the job name (loop_job) and the %j is shorthand for the JobID which will be assigned when the job is submitted.
Notice, we haven't specified an account, and Slurm will choose an account by default. However, if you would like to specify the account, you would include an additional option with #SBATCH --account= followed by the desired account. Use hyakalloc to see the available accounts and partitions can use for requesting jobs.
The commands you wish to execute will follow the #SBATCH option lines. In this case, we want to run loop_script.sh from 0 to 1000000 and see how long it takes:
time ./loop_script.sh 0 1000000
At the bottom of loop_job.slurm we explain all options in some detail for your reference.
Exit the nano text editor with ctrl+x. The command to submit batch jobs is sbatch. Submit the job using sbatch:
sbatch loop_job.slurm
If you set up a separate window to monitor your jobs (see the pro tip above), details about loop_job should appear in this window. The new log directory containing the output file should also be made by now:
cd log
ls
The listed output file name will look something like this:
loop_job_123456789.out
Examine the contents of the output file to see how long the sequence took:
cat loop_job_123456789.out
All outputs and error messages will appear in this file:
Sequence complete! Iterations from 0 to 1000000.

real    0m5.617s
user    0m5.570s
sys     0m0.016s
The purpose of this exercise was to execute a command via a batch job. The loop_job.slurm script requested the resources and executed the command to run loop_script.sh.
TODO
Literature Cited
Gardner, Dylan, Robben Migacz, and Brian Haymore. "Arbiter: Dynamically Limiting Resource Consumption on Login Nodes." Proceedings of the Practice and Experience in Advanced Research Computing on Rise of the Machines (learning). 2019. 1-7. DOI: 10.1145/3332186.3333043 Code: Gitlab