Interactive and Batch Jobs
Interactive Jobs
An interactive session on the cluster allows users to access a computing node in real time for tasks that require direct interaction, exploration, or debugging. If you have a quick job or you are preparing software to use later, an interactive session is the best choice.
Request an interactive job with the salloc command. Let's start an interactive job on the ckpt partition. We will specify that we want a single CPU with the flag --cpus-per-task=1, 5G of RAM with --mem=5G, and a maximum time of 20 minutes with --time=20:00. The job will automatically end after 20 minutes if we don't end it with the command exit before 20 minutes has elapsed.
salloc --partition=ckpt --cpus-per-task=1 --mem=5G --time=20:00
The output will look something like this:
salloc: Pending job allocation 18981043
salloc: job 18981043 queued and waiting for resources
salloc: job 18981043 has been allocated resources
salloc: Granted job allocation 18981043
salloc: Nodes n3424 are ready for job
Finally, your shell prompt will show that you are no longer on the login node, or look something like this:
[UWNetID@n3424 basics]$
Except that the word UWNetID will be replaced with your Net ID, and n3424 will be replaced with the node Slurm assigned to your interactive job. Finally, basics is the name of your current directory (your location on the filesystem), which maybe different for you. For this tutorial, you should be in the basics directory which you copied in the previous section. The basics directory contains the tutorial materials and will be your working directory for this tutorial.
Using Locator in interactive mode
Now that we have a job open on a compute node, we can work interactively in the container and test out our code. If the container allows it (most do), you can open a shell within the container and access the software that is installed there, run software-specific commands, and test and debug your code before submitting jobs to run unsupervised. This may also be your preferred method to run a job with a short runtime.
Before we do that, we will need a directory where our Locator results will be stored. For this tutorial, make a directory called out to hold your locator results.
mkdir out
Next open a shell inside the locator container, locator.sif with the following command.
apptainer shell --cleanenv --bind /gscratch/ locator.sif
Let's break this command down into its parts to understand it:
apptainer shell- Apptainer is the container runtime program on Hyak and withshellwe are asking apptainer to open a shell into the container.--cleanenv- Containers have their own environment variables that must be set for the software container to work properly. However, sometimes the environment variables from the host are too similar to those of the container, which can cause conflicts. The--cleanenvflag instructs the container to ignore environment variables from the host.--bind /gscratch/- The--bindflag mounts the Hyak filesystem/gscratch/to the container so that your datafiles can be computed against. By default, containers don't include your project data unless you specifically build them with a copy of your data. Mounting the filesystem/gscratchmeans that the container can access datafiles that do not exist inside the container.locator.sif- The last part of the full command is to pass the name of the Locator container to Apptainer.
You will know that you are inside of the container when your shell prompt looks like the following:
Apptainer>
Let's explore within the container by listing the root directory /
ls /
bin  boot  dev environment  etc  gscratch  home  lib  lib64  locator  media  mmfs1  mnt  opt  proc  root  run sbin  scr  singularity srv  sys  tmp  usr  var
Notice that we have all the directories we would have if we listed the root directory of klone, but now we have a directory locator/, which contains the files associated with the Locator GitHub Repository. Let's list the Locator program files:
ls /locator/
LICENSE.txt README.md data locator_py out req.txt scripts setup.py
Specifically the /locator/scripts/ subdirectory contains a file called locator.py, which is the python script used to run Locator neural network.
ls /locator/scripts/
install_R_packages.R locator.py locator_phased.py plot_locator.R vcf_to_zarr.py
Additionally, we have a version of python within the container and we can activate python as follows:
python
Python 3.8.13 (default, Mar 29 2022, 14:56:46)
[GCC 8.3.0] on linux
Type "help", "copyright", "credits" or "license" for more information.
>>>
Use exit() or hold the Ctrl key and press the D key to exit python.
Next, we can run Locator with the Populus trichocarpa dataset.
If you haven't already, it is critical you complete the set up instructions to follow along.
First, let's take a look at the data.
wc -l data/potr_genotypes1000.txt
# The genotypes matrix has 425 lines
# one row per individual tree plus a header
425 data/potr_genotypes1000.txt
head -3 data/potr_genotypes1000.txt
### Truncated for website view
"ALAA.20.1" 1 0 0 0 0 0 0 0 0 2 0 0 2 0 1 0 0 0 0 NA 0 1 1 0 0 0
"BELA.18.2" 0 0 0 0 1 0 0 0 0 0 1 0 0 NA 2 0 1 0 1 0 0 1 0 0  1  NA
### Truncated for website view
The genotypes matrix is composed of 0s, 1s, 2s, or NA. For this demonstration, I subsampled the full matrix (over 32,000 columns) such that this matrix has genotypes from 1000 sites in the genome.
Let's look at the sample data files as well.
wc -l data/potr_m_pred1.txt
425 data/potr_m_pred1.txt
The sample data files each have 425 lines one row per individual tree plus a header.
head data/potr_m_pred1.txt
"sampleID" "x" "y"
"BELA.18.3" -126.166667 52.416667
"BLCG.28.1" -125.183333 49.833333
"BULG.11.4" -126.8 54.45
"CEDA.10.4" -128.916667 54.95
"CHKD.19.3" -127.2 51.766667
"CHWH.27.5" NA NA
"CNYH.28.5" -125.066667 49.666667
"DENA.17.4" -126.616667 52.766667
"DENC.17.4" NA NA
The sample data contains:
- the sample ID
- the origin as longitude (x) and latitude (y) coordinates in decimal degrees
- each row is the origin of an individual tree
10% of the tree origins in sample data were randomly replaced with NA. These trees will serve as the test set. Locator will train the neural network based on the genotypes of 90% of the trees of known origin, validate the neural network on 10% of the trees of known origin, and then predict the origins of the trees in the test set, providing a set of longitudes and latitudes that can be compared with the true origins of the test set trees.
Let's test the code by running locator on one test set data/potr_m_pred1.txt
python /locator/scripts/locator.py --matrix data/potr_genotypes1000.txt --sample_data data/potr_m_pred1.txt --out out/potr_predictions1
# you should see the Epochs begin to compute after 10-30 seconds
Let's break this command down into its parts to understand it:
python /locator/scripts/locator.py- executes thelocator.pypython script.--matrix data/potr_genotypes1000.txt---matrixis the argument that indicates the provided filedata/potr_genotypes1000.txtis the genotype matrix.--sample_data data/potr_m_pred1.txt---sample_datais the argument that indicates the provided filedata/potr_m_pred1.txtis the sample data.--out out/potr_predictions1---outis the argument that indicates that results should be saved into theout/directory and that the files should have the prefixpotr_predictions1.
You'll know it is working when it starts providing some messages. The first messages are errors that can be ignored, unless we plan to use a GPU. There will be a few more errors because tensorflow could use a GPU. We won't use a GPU, so we can ignore the errors. The following indicated a successful start of a locator run:
loaded (1000, 424, 2) genotypes


filtering SNPs
running on 989 genotypes after filtering

### Truncated for website view
To enable them in other operations, rebuild TensorFlow with the appropriate compiler flags.
Epoch 1/5000
11/11 [==============================] - ETA: 0s - loss: 1.3765
Epoch 1: val_loss improved from inf to 0.70498, saving model to out/potr_predictions1_weights.hdf5
11/11 [==============================] - 2s 85ms/step - loss: 1.3765 - val_loss: 0.7050 - lr: 0.0010
Epoch 2/5000
11/11 [==============================] - ETA: 0s - loss: 0.8562
Epoch 2: val_loss improved from 0.70498 to 0.66874, saving model to out/potr_predictions1_weights.hdf5
11/11 [==============================] - 1s 64ms/step - loss: 0.8562 - val_loss: 0.6687 - lr: 0.0010
Epoch 3/5000
11/11 [==============================] - ETA: 0s - loss: 0.6853
Epoch 3: val_loss improved from 0.66874 to 0.63751, saving model to out/potr_predictions1_weights.hdf5
### Truncated for website view
predicting locations...
R2(x)=0.9011147471513719
R2(y)=0.9758116274801546
mean validation error 0.6421174928291902
median validation error 0.48744820589723886

run time 0.5494037707646687 minutes
With that command, you trained a neural network based on genotypes of Populus trichocarpa trees sampled across and you have predicted origins for a test set of Populus trichocarpa trees based on their DNA alone. Of course this tutorial is only using a subset of 1000 genomic sites to predict the locations of the "unknown" cases, so the error is not acceptable for true predictive application. You are free to explore training with the full dataset data/potr_genotypes.txt.
Let's look at your results.
ls out/
potr_predictions1_fitplot.pdf potr_predictions1_history.txt potr_predictions1_params.json potr_predictions1_predlocs.txt
See the Locator publication (Battey et al. 2020) and Locator GitHub Repository for full explanation of the output files.
The potr_predictions1_predlocs.txt file shows longitude and latitude positions for all individuals that were treated as unknowns in the test.
head out/potr_predictions1_predlocs.txt
x,y,sampleID
-134.91964819211591,58.435803669001785,ALSC.1.4
-122.8459170387414,45.644072664997694,CARS.29.3
-128.12848901483463,54.95290102466758,CDRE.10.3
-127.26174811400172,51.72250932734256,CHKD.19.1
-121.6691954064578,49.14120451469648,CHWH.27.5
-125.04810237947252,49.641106599108824,CNYH.28.4
-126.72995371793931,52.81267201275188,DENB.17.1
-126.78770090586458,52.82414669580753,DENC.17.4
-126.79467698648334,52.83947566564575,DEND.17.4
These data can be used to calculate the Haversine distance (a.k.a. "as the crow flies") between the true origin and the predicted origin for each individual, providing a data point for model prediction error. Combining the model error for all individuals provides a distribution of model error that can help us assess the model for predicting the origin of black cottonwood trees using DNA alone, but that data analysis is the topic for a different tutorial. In the next section, we'll prepare a Slurm script to execute this command unsupervised as a batch job.
Exit the container with exit. Your command prompt should return.
Apptainer> exit
exit
[UWNetID@n3162 basics]$
Batch Jobs
Next we are going to execute the EXACT same code, but as a single batch job and with the second test set of individuals potr_m_pred2.txt. Batch jobs are ideal for operations that take a longer time to run. These jobs are submitted to the job scheduler Slurm to execute and run in the background until completed.
We made a Slurm batch script for this tutorial. You can use this script as a template for submitting a single job to Slurm and replace the main command with your own command/s. For this demonstration, we have made the script for a general user, so it submits the job to the ckpt partition, which can be changed. If you want to make further changes, you will want to read the comments in the script carefully to edit the script to fit your needs for a different task.
Use the text editor nano to edit it as needed.
nano locator_NN_job.slurm
# exit nano by holding Ctrl and pressing X; then save it by pushing Y
#!/bin/bash

#SBATCH --job-name=locator_job
#SBATCH --partition=ckpt
#SBATCH --nodes=1
#SBATCH --ntasks-per-node=1
#SBATCH --mem=5G
#SBATCH --time=10:00
#SBATCH -o log/%x_%j.out


# command:
apptainer exec --cleanenv --bind /gscratch locator.sif python /locator/scripts/locator.py --matrix data/potr_genotypes1000.txt --sample_data data/potr_m_pred2.txt --out out/potr_predictions2

#### Truncated for website view
The command being executed is the same as that explained above, but with a different --sample_data input file and a distinct prefix for the output files. The difference we are demonstrating with this exercise is the lines in the script beginning with #SBATCH also known as "sbatch directives" or flags passed to sbatch which give instructions about the job we are requesting. This script requests a single node or a single server/computer and a single task with 5G of RAM or memory for a maximum time of 10 minutes. See Slurm sbatch documentation for the full list of options. Remember to use hyakalloc to find which accounts and partitions are available to you. If you have a compute or cpu-g2 partition available, replace --partition=ckpt with --partition=compute or --partition=cpu-g2 and your job will be scheduled faster because you will be requesting a job on resources with priority access.
Once you have edited the script to fit your needs, you can submit it with sbatch.
sbatch locator_NN_job.slurm
# the following is an example result
sbatch: No account specified, defaulting to: account
Submitted batch job 12345678
# Slurm will assign a JobID when the job was submitted
# it will likely be an 8-digit number, but not 12345678
Monitoring the Slurm Job Queue
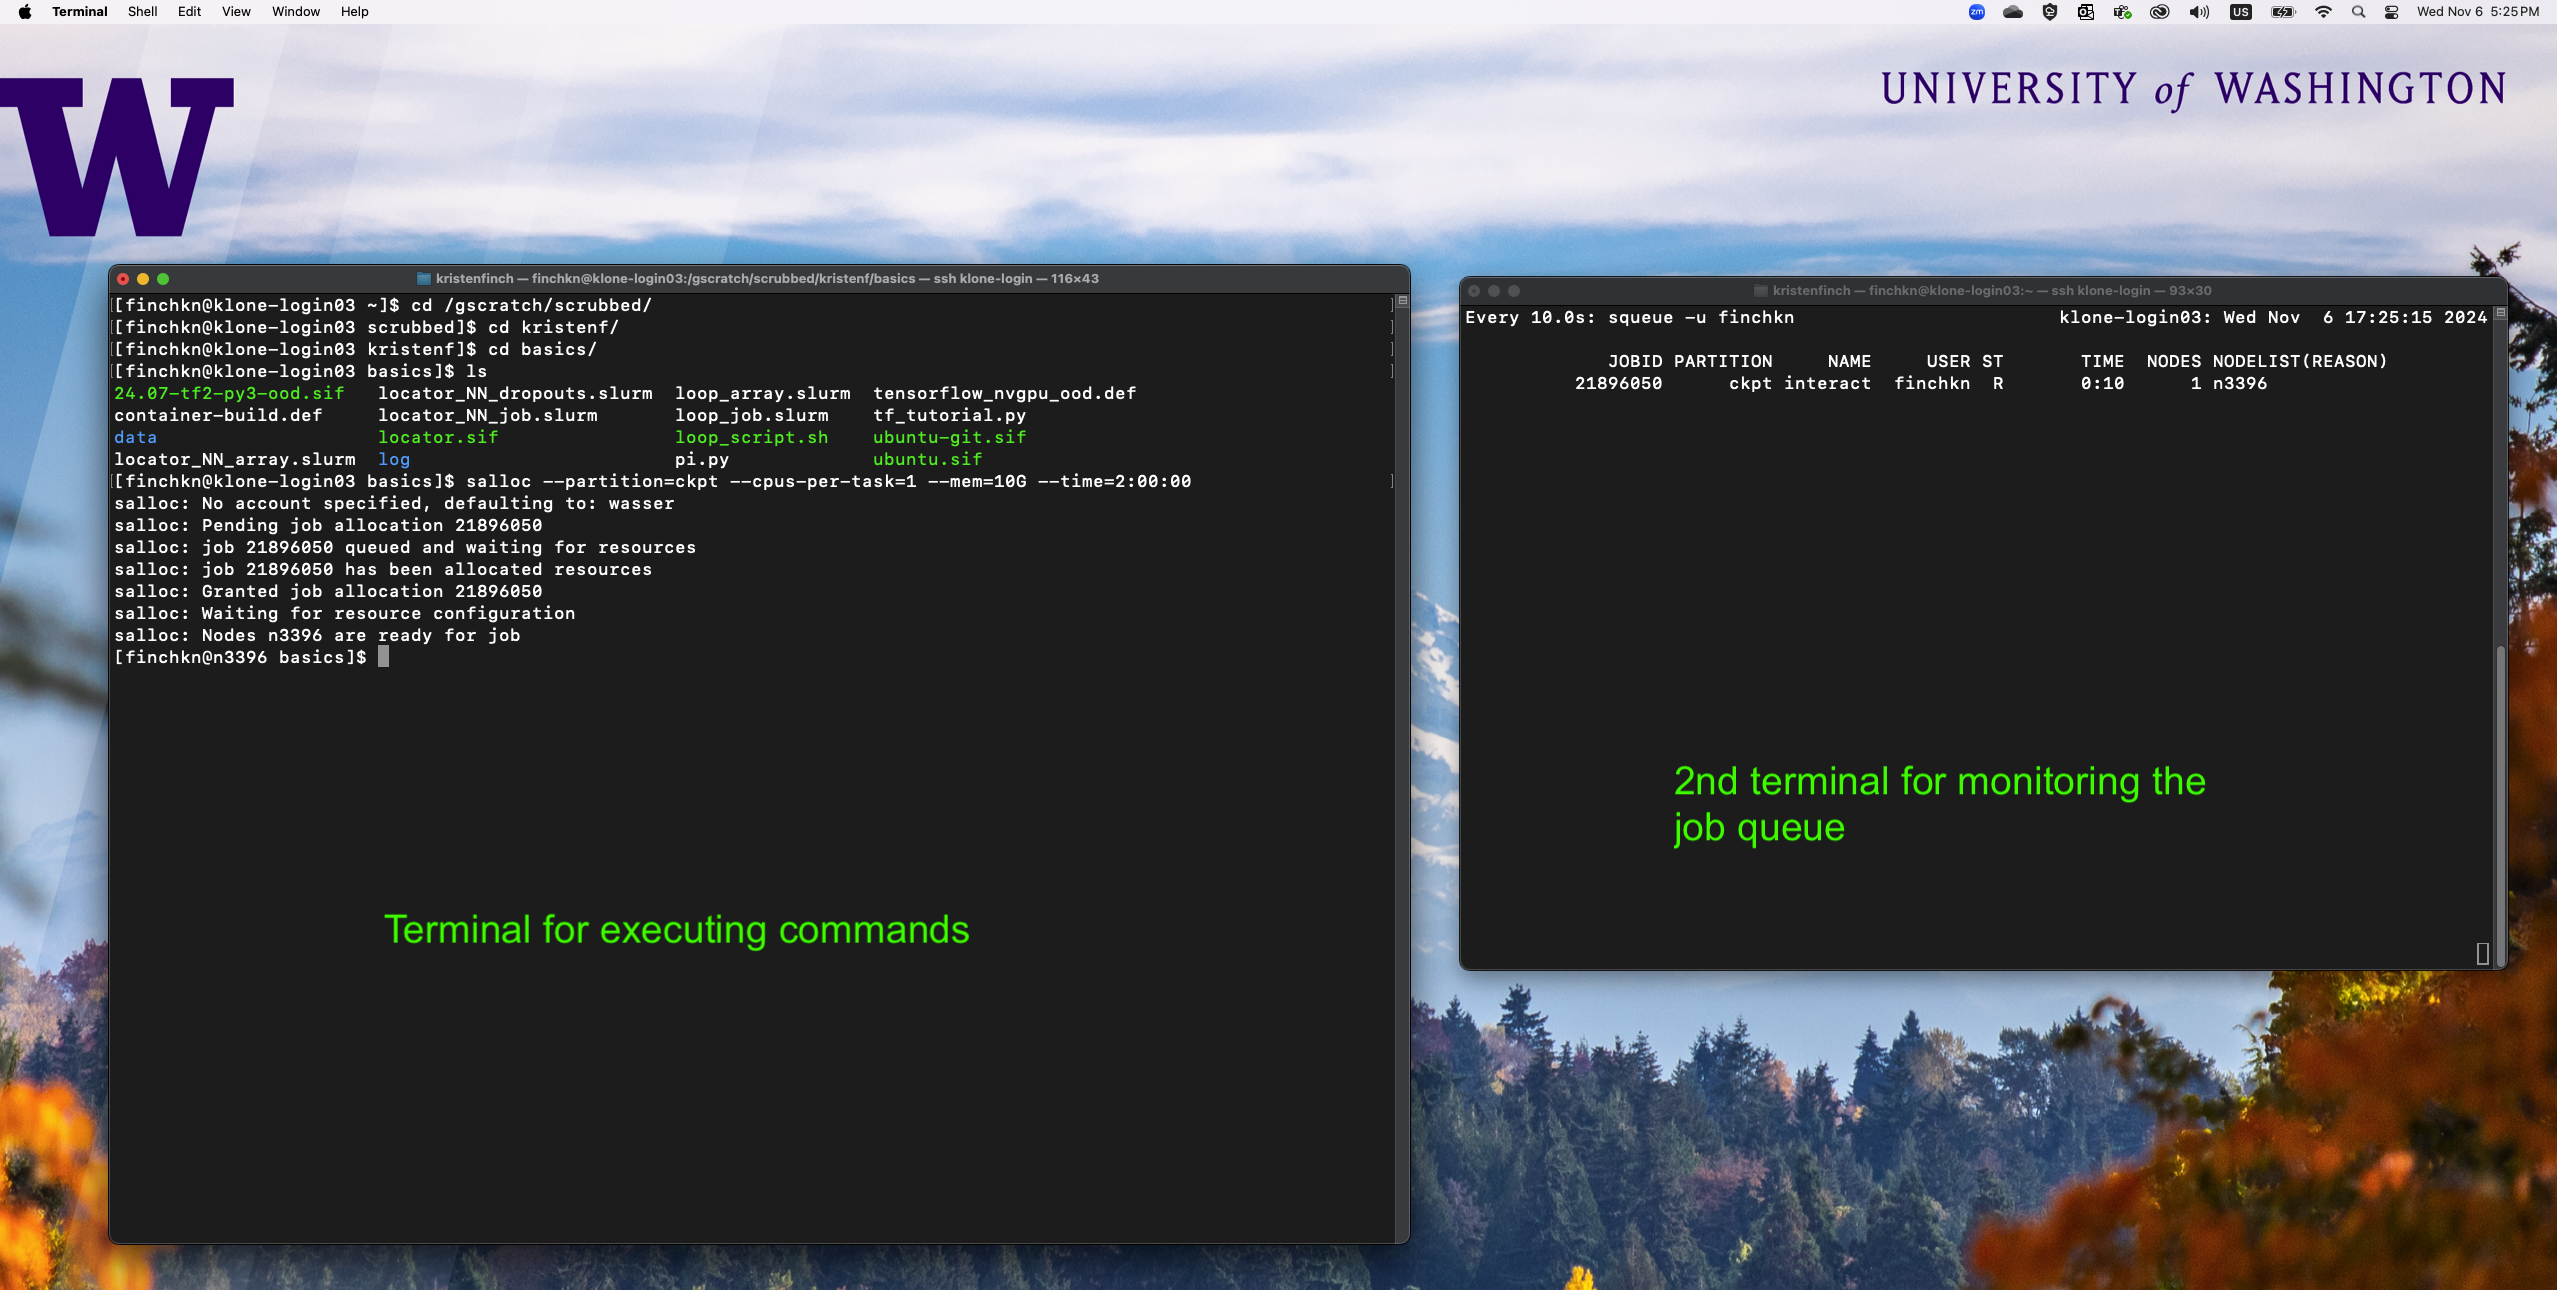
In this section, it is often useful to have two terminal windows open and logged into klone. One for editing scripts and issuing commands and one for monitoring active jobs in the squeue. Open up a second terminal and use ssh to login to Hyak. In this terminal, monitor jobs using the command:
# Below replace the word "UWNetID" with your UW NetID.
watch squeue -u UWNetID
watch will issue the following command ( squeue -u UWNetID ) every 2 seconds, allowing you to see the jobs you have submitted enter the queue and change states. Right now the queue is likely empty because we haven't requested any jobs yet, but they will appear in this window as we continue with the tutorial.
The STate of the job is listed under "ST" in this window. Some of the most common job states are:
- PD: Pending job
- R: Running job
- S: Suspended job
- CG: Completing job
- CD: Completed job
In the next exercises, leave this terminal open and execute watch -n 10 squeue -u UWNetID. Continue with the exercises in the other terminal window.
As soon as the job begins, Slurm will save a file called locator_job_12345678.out where the number is replaced with the JobID Slurm assigned to your job. The output that would normally be printed to the screen while locator is running (which we saw when we ran locator interactively) will be saved to this file. View this file with cat
more locator_job_12345678.out
Or follow the messages in real time with the tail command and the flag --follow.
tail --follow locator_job_12345678.out
# Use Ctrl + C to exit the tail command
Congratulations, you just trained a neural network based on genotypes of Populus trichocarpa trees and you have predicted origins for a second test set of Populus trichocarpa trees based on their DNA alone. But this time you did it with an unsupervised batch job. Let's look at your results.
ls out/
potr_predictions1_fitplot.pdf  potr_predictions1_params.json   potr_predictions2_fitplot.pdf  potr_predictions2_params.json
potr_predictions1_history.txt  potr_predictions1_predlocs.txt  potr_predictions2_history.txt  potr_predictions2_predlocs.txt

head out/potr_predictions2_predlocs.txt
x,y,sampleID
-126.6824556618361,52.28918750153857,BELC.18.1
-126.832089065367,52.31092787450795,BELC.18.5
-123.01705302953444,46.47589331561,CARS.29.2
-127.29940751539401,51.750880602889794,CHKD.19.5
-121.72059406365925,49.29831855856583,CHWH.27.5
-121.80840511339338,49.19749305063466,CHWK.27.2
-125.10795643505986,49.613891258205996,CNYH.28.5
-126.81512181108964,52.73697246518585,DENA.17.2
-123.04024738823856,44.4420668151814,HALS.30.4
The Slurm job completed completely in the background, meaning that we could have submitted the job, ended our connection to klone by logging out, and returned later to view the progress or results. You can instruct Slurm to send messages about jobs completing by adding the following sbatch directives to your Slurm script and replacing the work UWNetID with your UW Net ID:
#SBATCH --mail-type=ALL
#SBATCH --mail-user=UWNetID@uw.edu
In the next section, we will use a Slurm batch script to submit multiple jobs as an array to be executed in the background in parallel.