Pytorch and CUDA11

ยท 3 min read
Nam Pho
Director for Research Computing
info

During the January 12, 2021 mox maintenance period long overdue package updates will be applied. The most user impactful upgrade is the GPU driver from to 418.40.04 to 460.27.04 that will allow for CUDA11 support (up from CUDA10).

The single biggest research use for GPUs on Hyak is for machine learning and artificial intelligence and the community has been clamoring for CUDA11 support for some time. Unfortunately, it's not easy to separate the GPU driver from the node images so it had to wait until the next maintenance window and some testing for non-ML GPU workflows on Hyak like our gromacs users in the molecular dynamics community.

tl;dr your existing Pytorch codes should work but if you wanted to use the new features in Pytorch that required CUDA11 you can upgrade Pytorch and it will work.

Installing Pytorch with CUDA11โ€‹

Since this is now the latest and greatest on Hyak I've taken the opportunity to update the Python documentation on how to install Pytorch with CUDA11 support within a miniconda3 environment, check out the step-by-step here.

Reverse compatibility with CUDA10โ€‹

Before the January 12, 2021 cluster maintenance every GPU on Hyak had a driver with CUDA10 and all of your codes were previously compiled against it. To test that the GPU driver update to CUDA11 wouldn't impact the most popular machine learning libraries we are compiling Pytorch against our pre-maintenance CUDA10 and testing it against a GPU with the newer CUDA11 installed.

conda create -p /gscratch/scrubbed/npho/pytorch-cuda10 python=3.8 -y

Activate your new pytorch-cuda10 environment:

conda activate pytorch-cuda10

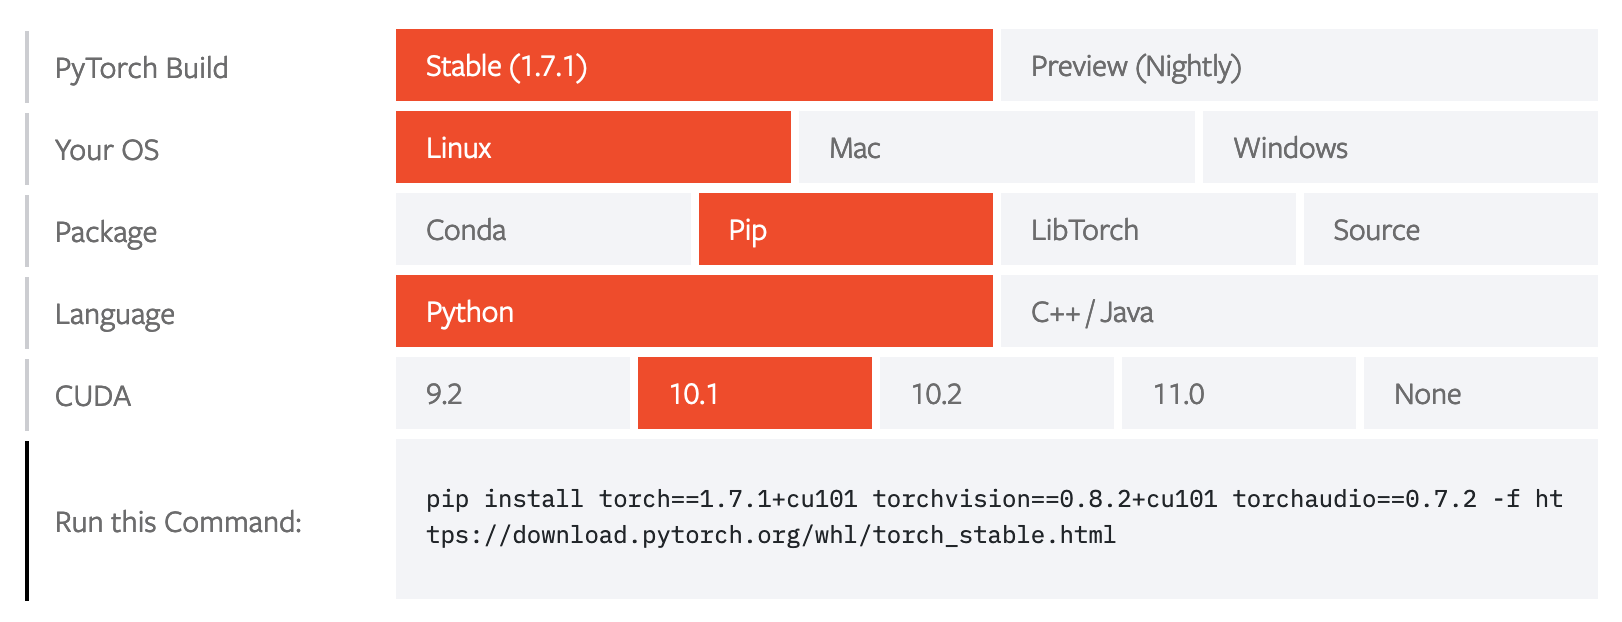
The Pytorch website has a nice getting started matrix that generates the requisite install commands against CUDA10.

pytorch-cuda10

The command shown above to copy-and-paste below:

pip install torch==1.7.1+cu101 torchvision==0.8.2+cu101 torchaudio==0.7.2 -f https://download.pytorch.org/whl/torch_stable.html

Now we can load the Python interpreter and confirm Pytorch is installed and the CUDA10 compiled library recognizes this GPU with CUDA11.

(pytorch-cuda10) $ python3 Python 3.8.5 (default, Sep 4 2020, 07:30:14)
[GCC 7.3.0] :: Anaconda, Inc. on linux
Type "help", "copyright", "credits" or "license" for more information.
>>> import torch
>>> torch.__version__
'1.7.1+cu101'
>>> torch.cuda.is_available()
True
>>>

Success!

Previously compiled libraries against CUDA10 from pre-January 12, 2021 maintenance times should still work on the GPUs now with CUDA11. However, if you want to use the full features of libraries that take advantage of newer capabilities in CUDA11 then you should definitely upgrade your libraries.

gromacs on GPUs

ยท 6 min read
Nam Pho
Director for Research Computing
info

During the January 12, 2021 mox maintenance period long overdue package updates will be applied. The most user impactful upgrade is the GPU driver from to 418.40.04 to 460.27.04 that will allow for CUDA 11 support (up from CUDA 10).

The second most widely used GPU-enabled workflow on HYAK (besides machine learning) is molecular dynamics (MD) so we wanted to test one of the most popular MD codes, gromacs source, and ensure this driver upgrade wouldn't negatively impact our researchers. I couldn't find gromacs compiled with GPU support currently in our module collection so I used it as an opportunity to create one for you all, read on!

warning

This is an exercise to demonstrate the support for molecular dynamics on GPUs as a proof-of-concept. Scientific verification of the software compile options (e.g., single-precision) and its results is the responsibility of the researcher.

Using gromacsโ€‹

I'll start with the end result for those of you who just want to use it but following that I'll dive into the nuts and bolts of how we created the module so you can perform additional optimizations.

This is a GPU-enabled version of gromacs so we need a GPU first (can verify with nvidia-smi).

salloc -A uwit -p ckpt --time=4:00:00 -n 4 --mem=20G --gpus=1

gromacs-2020.4 moduleโ€‹

Once we have a GPU we use modules to load gromacs-2020.4 and all its required dependencies (e.g., CUDA11).

module load gromacs/2020.4-cuda11.1

All packages are sub-commands of the gmx binary so you can verify the module.

$ gmx -version
:-) GROMACS - gmx, 2020.4 (-:

GROMACS version: 2020.4
Verified release checksum is 79c2857291b034542c26e90512b92fd4b184a1c9d6fa59c55f2e24ccf14e7281
Precision: single
Memory model: 64 bit
MPI library: thread_mpi
OpenMP support: enabled (GMX_OPENMP_MAX_THREADS = 64)
GPU support: CUDA
SIMD instructions: AVX_512
FFT library: fftw-3.3.3-sse2
RDTSCP usage: enabled
TNG support: enabled
Hwloc support: hwloc-1.11.8
Tracing support: disabled
C compiler: /sw/gcc/10.1.0/bin/gcc GNU 10.1.0
C compiler flags: -mavx512f -mfma -fexcess-precision=fast -funroll-all-loops -O3 -DNDEBUG
C++ compiler: /sw/gcc/10.1.0/bin/g++ GNU 10.1.0
C++ compiler flags: -mavx512f -mfma -fexcess-precision=fast -funroll-all-loops -fopenmp -O3 -DNDEBUG
CUDA compiler: /sw/cuda/11.1.1-1/bin/nvcc nvcc: NVIDIA (R) Cuda compiler driver;Copyright (c) 2005-2020 NVIDIA Corporation;Built on Mon_Oct_12_20:09:46_PDT_2020;Cuda compilation tools, release 11.1, V11.1.105;Build cuda_11.1.TC455_06.29190527_0
CUDA compiler flags:-gencode;arch=compute_35,code=sm_35;-gencode;arch=compute_37,code=sm_37;-gencode;arch=compute_50,code=sm_50;-gencode;arch=compute_52,code=sm_52;-gencode;arch=compute_60,code=sm_60;-gencode;arch=compute_61,code=sm_61;-gencode;arch=compute_70,code=sm_70;-Wno-deprecated-gpu-targets;-gencode;arch=compute_35,code=compute_35;-gencode;arch=compute_50,code=compute_50;-gencode;arch=compute_52,code=compute_52;-gencode;arch=compute_60,code=compute_60;-gencode;arch=compute_61,code=compute_61;-gencode;arch=compute_70,code=compute_70;-gencode;arch=compute_75,code=compute_75;-gencode;arch=compute_80,code=compute_80;-use_fast_math;;-mavx512f -mfma -fexcess-precision=fast -funroll-all-loops -fopenmp -O3 -DNDEBUG
CUDA driver: 11.20
CUDA runtime: 11.10

Test simulation of Lysozymeโ€‹

I used a tutorial from the gromacs website here to show it runs processes on GPU(s). The tutorial runs an MD simulation on a lysozyme but that's the extent of my study there. The commands below are a summary of the tutorial with a note that the genbox subcommand is now replaced by solvate.

gmx pdb2gmx -f 1LYD.pdb -water tip3p
gmx editconf -f conf.gro -bt dodecahedron -d 0.5 -o box.gro
gmx solvate -cp box.gro -cs spc216.gro -p topol.top -o solvated.gro
gmx trjconv -s solvated.gro -f solvated.gro -o solvated.pdb
gmx grompp -f em.mdp -p topol.top -c solvated.gro -o em.tpr -maxwarn 3

The final gromacs command below starts the fun, the documentation suggests it will automatically identify the GPUs available to send work to them. However, there are more explicit GPU arguments we encourage you to explore.

gmx mdrun -v -deffnm em

You can ssh into the node you're using in a separate window to have a parallel nvidia-smi command run so we can monitor the load on the GPU(s).

+-------------------------------------------------------------------+
| Processes: |
| GPU GI CI PID Type Process name GPU Memory |
| ID ID Usage |
|===================================================================|
| 0 N/A N/A 143353 C gmx 165MiB |
| 1 N/A N/A 143353 C gmx 165MiB |
| 2 N/A N/A 143353 C gmx 167MiB |
| 3 N/A N/A 143353 C gmx 167MiB |
| 4 N/A N/A 143353 C gmx 167MiB |
| 5 N/A N/A 143353 C gmx 167MiB |
| 6 N/A N/A 143353 C gmx 167MiB |
| 7 N/A N/A 143353 C gmx 165MiB |
+-------------------------------------------------------------------+

We can see a process occupying each GPU so it works! At least, gromacs uses GPUs...the GPUs themselves weren't stressed heavily and that requires the user to increase the number of rank processes and match that with available GPUs. You can do this by adding arguments to the gmx mdrun command but by default it did 2 ranks per GPU it detected, which is not a lot.

(Optional) Compile Notesโ€‹

You need CUDA11, GNU Compiler, and OpenBLAS library for the version I put together but I was focused on a proof-of-concept and not squeezing out every last drop of performance. There's a lot of further optimization to be done and that's left as an exercise for the reader:

  1. Try the Intel compiler and see if it provides further optimization for non-GPU parts of the workflow.
  2. Try other math libraries (e.g., MKL) and see if it speeds things up.
  3. Add in MPI support if you want to use multiple GPUs across multiple nodes.
  4. Add in modules (e.g., PLUMED).
  5. Other stuff I can't think of with compile flags here.

Download Sourceโ€‹

From the login node I staged a folder in the modules directory.

cd /sw/gromacs/2020.4-cuda11.1

Grab regression tests.

wget http://gerrit.gromacs.org/download/regressiontests-2020.4.tar.gz

Download gromacs-2020.4 source].

wget ftp://ftp.gromacs.org/pub/gromacs/gromacs-2020.4.tar.gz

Get a GPU and Codeโ€‹

I used the shared build-gpu node for an interactive session but if you are affiliated with a group that has their own you can use that instead.

salloc -A uwit -p ckpt --time=4:00:00 -n 4 --mem=20G --gpus=1

Once you get a session with GPU (you can run nvidia-smi to confirm you see one). Extract regression tests.

tar xvzf regressiontests-2020.4.tar.gz

Do the same for the gromacs code and enter the directory.

tar xzvf gromacs-2020.4.tar.gz
cd gromacs-2020.4

Pre-requisite Modulesโ€‹

Modules loaded individually for readability but you could load all modules in one command. Get a refresher on modules here.

module load cmake/3.11.2
module load gcc/10.1.0
module load cuda/11.1.1-1
module load contrib/openblas/0.2.20

Compileโ€‹

I created a subdirectory within the source to compile.

mkdir cuda11
cd cuda11

Use cmake to create the Makefile. Note: if you copy-and-paste the cmake command below you will have to modify the paths referenced for your environment.

cmake .. -DGMX_BUILD_OWN_FFTW=OFF -DREGRESSIONTEST_DOWNLOAD=OFF -DGMX_GPU=ON -DGMX_MPI=OFF -DCMAKE_INSTALL_PREFIX=/sw/gromacs/2020.4-cuda11.1 -DREGRESSIONTEST_PATH=/sw/gromacs/2020.4-cuda11.1/regressiontests-2020.4 -DCUDA_TOOLKIT_ROOT_DIR=/sw/cuda/11.1.1-1

With the Makefile ready you can run make -j 4 and replace 4 with however many cores you have in your session then make install. I created the module file separately so you can load it with module load gromacs/2020.4-cuda11.1 and run the single gmx binary.

Hello world!

ยท 2 min read
Nam Pho
Director for Research Computing

tl;dr (1) decommissioned a cluster, (2) got a bunch of GPUs for machine learning, (3) launched a cluster, and (4) new and improved documentation.

2020 has definitely been an eventful year but here on Team Hyak we've been trying to make the best of a bad situation (lemons out of lemonade and such). This year saw the decommissioning of the 1st generation Hyak cluster, ikt, and the soft launch of our 3rd generation Hyak cluster, klone. Our partnership with the Allen School and other departments across campus has enabled an explosion in on-campus GPU capacity for the current 2nd generation Hyak cluster, mox. This is all very exciting, machine learning is only going to get bigger. We realize whether you do your research on your laptop, Hyak, or the cloud that at the end of the day it's all just a computer and what matters is what you can actually do with it. Therefore, we are placing more emphasis on new and improved documentation (this website) and will be doing more regular research tutorials on Hyak throughout the coming year.

We hope you have weathered the adversity 2020 brought upon everyone. It has been a tough year for sure, but may your 2021 be brighter and have improvements in store. The Hyak Team has lots of efforts in the works to benefit supporting your research and they will hit full stride in the coming year. This is one improvement we can all look forward to in 2021.

scRNA-seq

ยท One min read
Nam Pho
Director for Research Computing

Over the past year we've done a bunch of outreach to labs within the genomics community here at the UW. Given my research background it's where I feel most comfortable and this type of research is underrepresented on the cluster. Given where the field is going it's inconceivable they aren't using Hyak or HPC in general! Those lab closet clusters and under bench servers gotta go, there is a better way and we'll show you how to do some scRNA-seq today ๐Ÿ™‚

TODO